How to Adjust Garage Door Cable Tension: The Ultimate Guide
If you’ve ever experienced problems with your garage door, it’s likely that the tension on the cables was to blame. Garage door cables are responsible for transferring power from the opener to the door itself, and if they’re not adjusted correctly, they can lead to all sorts of issues. In this article, we’ll walk you through how to adjust garage door cable tension using a few simple tools. We’ll also provide some tips on how to avoid common mistakes made by homeowners when adjusting their garage door cables.
What is a garage door cable do?
The cables on your garage door are responsible for transferring power from the opener to the door itself. If the tension on these cables is not correctly adjusted, it can lead to all sorts of problems, such as:
- The door not opening or closing properly
- The door coming off its tracks
Why do I need to adjust the tension on my garage door cables?
There are a few reasons why you might need to adjust the tension on your garage door cables. Maybe you recently replaced your garage door opener, and the new one is putting too much or too little tension on the cables. Or maybe your garage door has been making loud noises lately, and you suspect that the cables are to blame.
Whatever the reason, adjusting the tension on your garage door cables is a relatively simple process that anyone can do with a few basic tools.
How do I adjust garage door cable tension?
Adjusting the tension on your garage door cables is a two-person job. One person should hold the door in place while the other adjusts the cables.
You’ll need a few simple tools for this job, including:
- A drill
- A screwdriver
- A socket wrench
- An adjustable wrench
Steps to adjust garage door cable tension:
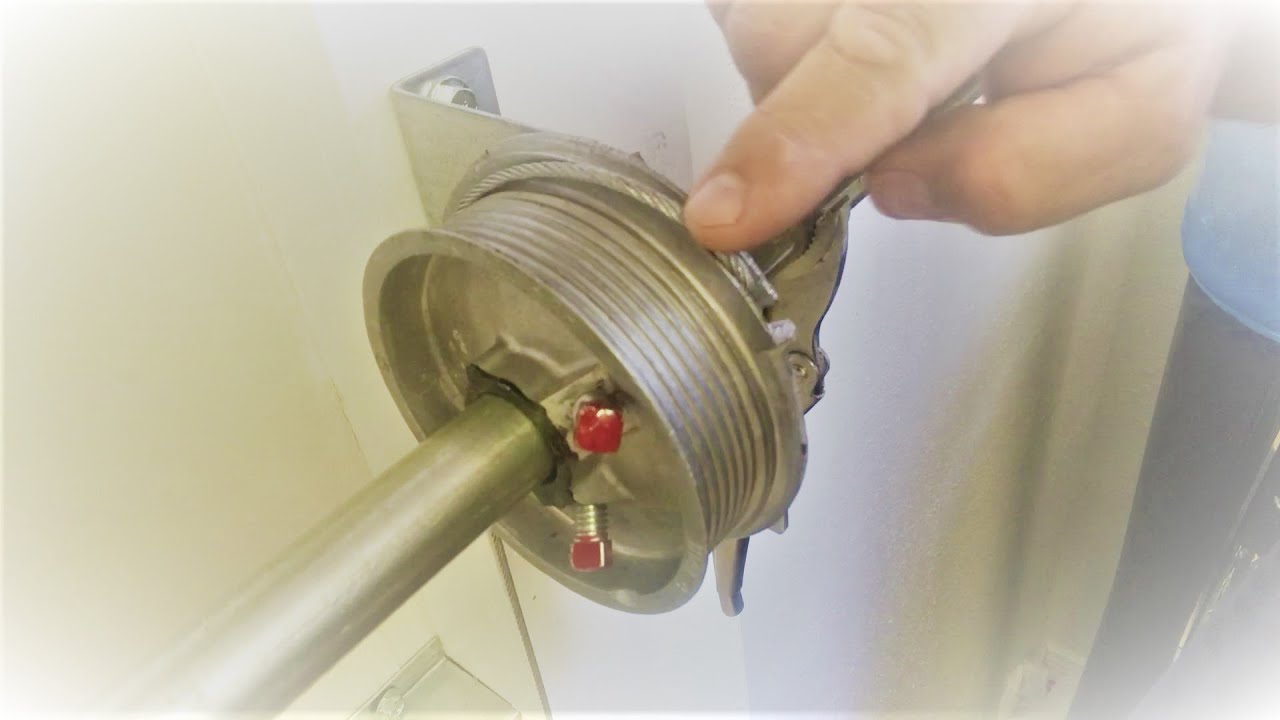
First, locate the two cable drums on either side of your garage door. These are usually located near the top of the door, and they’re where the cables are wound around.
Using the drill, remove the screws that hold each cable drum in place. Once the screws are removed, you should be able to slide the drums off of their shafts.
Next, use the socket wrench to loosen the nuts that secure the cables to the bottom brackets. Once these nuts are loose, you’ll be able to adjust the tension on the cables by moving them up or down the shafts.
If you need to add tension to the cables, start by moving each cable one notch higher on its respective shaft. If you need to release tension from the cables, move each cable one notch lower on its shaft.
Once you’ve made the necessary adjustments, use the drill to screw the cable drums back into place. Then, use the adjustable wrench to tighten the nuts that secure the cables to the bottom brackets.
Now that you know how to adjust garage door cable tension, check out our other garage door maintenance tips. From how to lubricate your garage door to how to change your garage door opener batteries, we have all the information you need to keep your garage door in top shape.
Conclusion
These links generally run somewhere in the range of $25-$50 dollars. When you have the maintenance parts, just supplant the current links with the new ones. Try to have the carport shut while making fixes. When the links have been supplanted, stand somewhere around 15 feet away and open the carport entryway. Remaining far enough away is significant on the off chance that you introduced the links off-base and a spring breaks. Assuming the entryway opens and closes, ensure the check the maintenance work you have also achieved at regular intervals. Links stretch and cause slack which can keep on putting an excessive amount of weight on the above engine and the springs. Assuming the links become free, basically cut the finish of the link and abbreviate it to raise any leeway.
In the event that you are too apprehensive to even think about being around the springs to do the maintenance, basically call your nearby carport repairman administration.
I hope you enjoyed reading this guide. Thanks for reading!